FlareOn11: 02 - Checksum
We are presented with a GO binary, which differs a bit when it comes to reverse engineering typical C/C++ binaries. However, that should not stop us from being able to figure out what is going on.
An introduction to GO binaries
First, let us briefly look a bit more into general Go binaries. Go binaries refer to executable files that are compiled from source code written in the Go programming language (often referred to as “Golang”). When a Go application is compiled, the Go compiler translates the human-readable Go code into machine code that the operating system can execute. This process produces a binary file.
These binaries are:
-
Static: By default, Go compiles its executables statically. This means all required libraries are included within the binary itself. As a result, Go binaries can often run without any external dependencies, making deployment easy across systems that have the same architecture and operating system.
-
Cross-platform: Go supports cross-compilation, which allows us to compile binaries for different target platforms from a single code base. For example, developers can produce Windows, macOS, or Linux executables from a machine running any of these operating systems.
-
Self-contained: The standard libraries, along with any external packages used in the application, are included in the binary. This trait simplifies deployment and version control, as only the binary needs to be distributed and updated.
-
Performance-oriented: Go binaries are optimized for performance, with features such as goroutines providing concurrent execution models that allow applications to take full advantage of multi-core processors.
To create a Go binary, developers use the go build command followed by the file or package to compile. For example:
go build main.go
This command will produce an executable named after the Go file (minus the .go extension) or the containing directory if multiple files form a package. The resulting binary can then be transferred to a server or another compatible computer and run without needing any Go runtime or environment installed.
Here is a simple example of a Go program (main.go):
package main

import "fmt"

func main() {
    fmt.Println("Hello, World!")
}
After running go build main.go, we’d have an executable (main on Unix-like systems, main.exe on Windows) that can be run to output “Hello, World!” to the console.
The Checksum binary
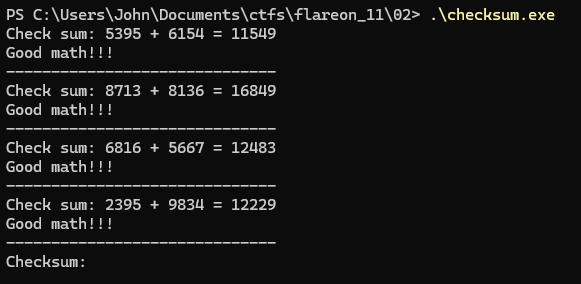
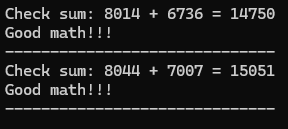
So, now that we have a little background about GO binaries, let’s look what we are presented with. When first running the binary we are greeted with:

So, we are presented with a ‘joke’, we need to check the sum (get it?), and it asks this a couple more times, before it asks for a checksum.
So a couple of questions arise:
- Is the checksum always the same?
- Do these sum checks influence the required checksum?
- If not, can we remove these checks?
- Is the checksum relevant to the challenge?
Looking at the binary
With these GO challenges it is easy to get lost, luckily this seems like a small binary, but it’s good to not forget what we are looking for. So, let’s see if we can open the challenge in x64dbg and see what we can do. As explained earlier, I know this is not the preffered method of looking at GO binaries, but I sometimes like to take a different approach to see if we can learn anything from it, just like we did with challenge #1. An easier method would be to analyse this with Ghidra, or IDA. Here we see that the binary asks for the math questions and it checks how many questions are answered, if it is less than 7, As could be seen here:
And in x64dbg:

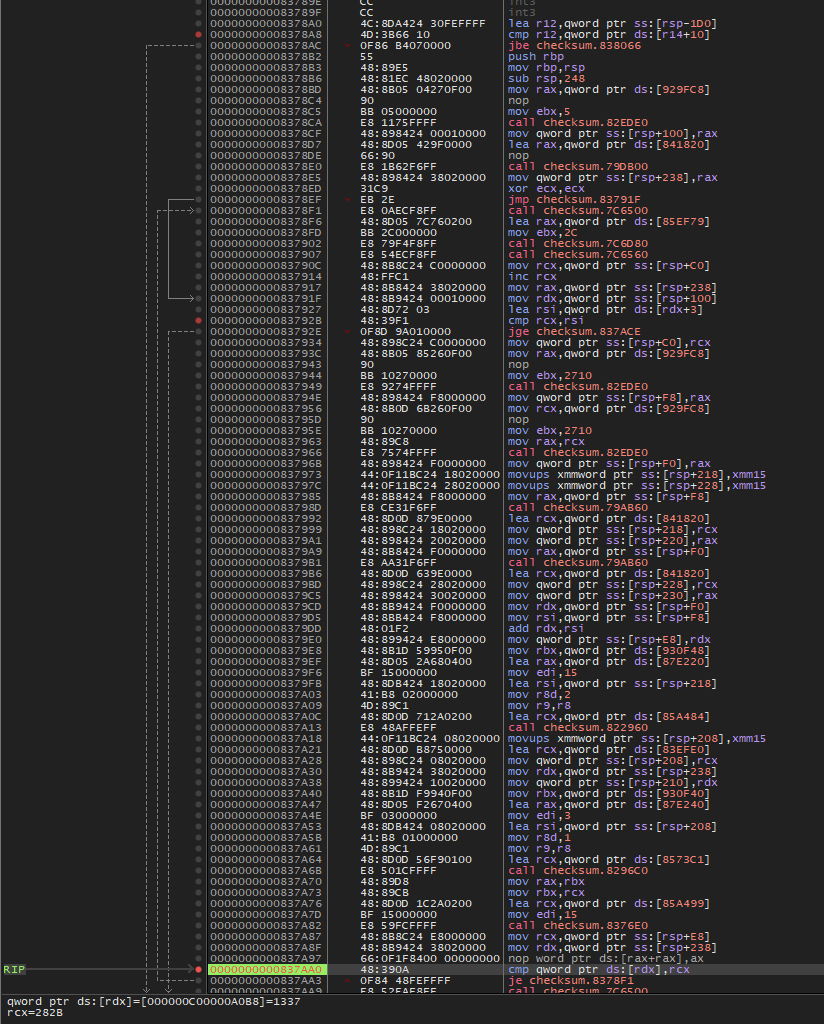
The line we need to look at:
000000000083792B | 48:39F1 | cmp rcx,rsi
See their corresponding register values in the bottom left of the screen.
We see that it compares the summed value with what it expected:

And:
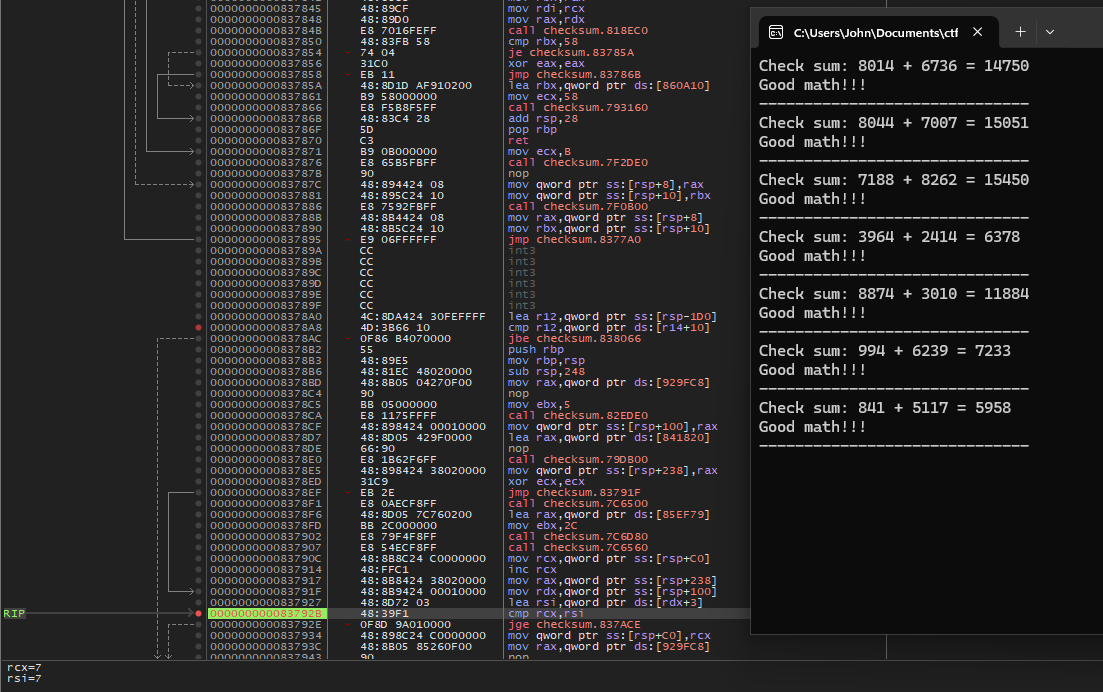
The line we need to pay attention to is:
0000000000837AA0 | 48:390A | cmp qword ptr ds:[rdx],rcx
Here, RCX containts the value it expected, where qword ptr ds:[rdx] has the value inserted by the user.
it continues, if not, it moves to the next part of the binary. Then, it asks for the checksum.
Now, as much as I love math, I don’t like to enter the answer to this question every time, so let’s patch it. There are many ways to achieve this, we can NOP all instructions relevant to checking how many sums we did, we can let the counter increase by 7 each time we answer a question correctly, we can let it always pass no matter what value we give as answer, we can flip the check from jge to jle. So the line
000000000083792E | 0F8D 9A010000 | jge checksum.837ACE
becomes
000000000083792E | 0F8D 9A010000 | jle checksum.837ACE
Since this is one of the easier challenges, we will take soms time to understand what the approach here is.
If we look at the screenshot, or the text lines we copied above, we see the opcode starting with 0F8D.
The hexadecimal number 0F8D in x86 assembly language represents the opcode for the JNL or JGE instruction, depending on the context where it’s used. Both mnemonics stand for “Jump if Not Less” and “Jump if Greater or Equal,” respectively. They are conditional branch instructions used to alter the flow of execution based on the comparison of two values.
Here’s a breakdown of how this instruction works:
JNL/JGE (Jump if Not Less / Jump if Greater or Equal): This instruction checks the status of the zero flag (ZF) and the sign flag (SF) in the EFLAGS register after a comparison instruction like CMP has been performed. If the values compared are greater than or equal, or if the last subtraction resulted in zero (meaning the values are equal), the result is not less than, and the jump is taken. Or in terms of flags, the jump takes place if ZF = 1 or SF = OF (where OF is the overflow flag), maintaining the signed comparison’s correctness. That is why we took the jump each time the value of `RCX`` was less than 7.
The actual 0F8D opcode is typically followed by a relative offset, which could be a 16 or 32-bit value depending on the operand-size attribute of the instruction. This offset is added to the instruction pointer (EIP register on 32-bit x86 CPUs, or RIP on 64-bit x64 CPUs), effectively jumping to a new location within the code if the condition is true. In machine code, the opcode and the offset together make up the complete instruction.
Here’s an illustrative example in x86 assembly language:
cmp eax, ebx     ; Compare the values in EAX and EBX registers
jge .Label       ; If EAX is greater than or equal to EBX, jump to the label
Where .Label would be an identifier in the code that you want execution to jump to if the comparison meets the condition specified by JGE.
In our case we saw that it was:
cmp rcx, rsi
jge checksum.837ACE
So.. with this theory in mind, let’s see how to negate that statement, using JLE, this stands for “Jump if Less or Equal.” This conditional jump instruction causes the program to branch to a different part of the code if the result of the last comparison operation indicated that the source was less than or equal to the destination, or if the zero flag (ZF) is set (indicating equality), or if the sign flag (SF) does not equal the overflow flag (OF), indicating a less than condition when signed numbers are compared.
The opcode for JLE is typically represented by the hexadecimal bytes 0F 8E. Similar to JNL/JGE, it is followed by a relative offset, which is a 16 or 32-bit value in modern x86 architecture (or potentially an 8-bit value in a short jump), that is used to determine where the jump in the code will land if the condition is met.
Here’s how JLE might appear in a piece of assembly code:
cmp eax, ebx     ; Compare the values in EAX with EBX
jle .LessOrEqual ; If EAX is less than or equal to EBX, jump to the specified label
; Other code
.LessOrEqual:
; Code to execute if the comparison determined EAX <= EBX
In this code snippet, .LessOrEqual is a label that marks the location in the code to jump to if EAX contains a value less than or equal to EBX. This instruction is useful in loops and other control flow structures where such a decision needs to be made based on the outcome of a comparison.
In binary form, the actual machine code representation of the JLE instruction depends on the specific offset it is combined with, as the actual opcode (0F 8E) is just the beginning of the instruction and it does not include the operand that specifies the jump target.
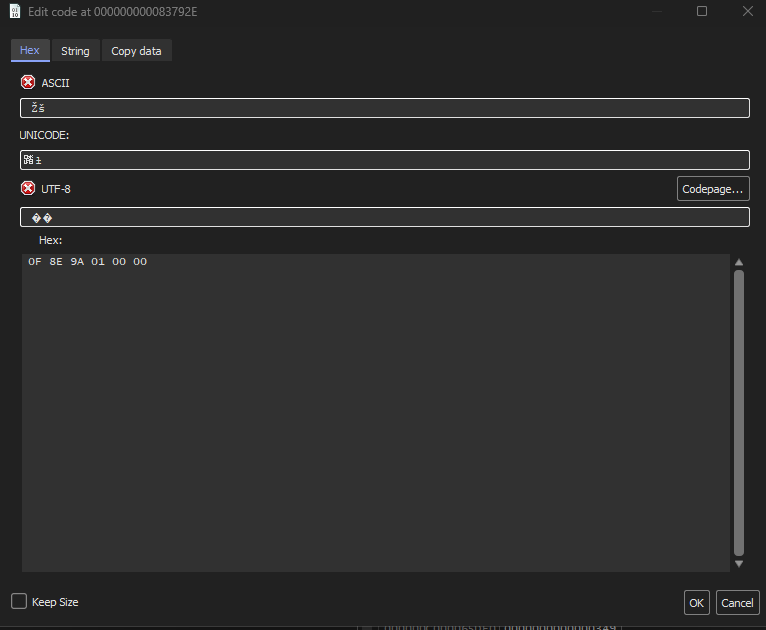
So, back to x64dbg, we can select the right line, and hit CTR+E, and modify the code:
Now, running the program again should skip the sum checks. So it immediately ask for a checksum, let’s see what that actually does. We see that quite some things are going on. We see that it tries to read a string of 64 characters, so 32 bytes, then it does some chacha magic.
After that it tries to XOR this, with the string:
"FlareOn2024bad verb '%0123456789_/dev/stdout/dev/stderrCloseHandleOpenProcessGetFileTypeshort write30517578125bad argSizemethodargs(reflect.SetProcessPrngMoveFileExWNetShareAddNetShareDeluserenv.dllassistQueuenetpollInitreflectOffsglobalAllocmSpanManualstart traceclobberfreegccheckmarkscheddetailcgocall nilunreachable s.nelems= of size runtime: p ms clock, nBSSRoots=runtime: P exp.) for minTrigger=GOMEMLIMIT=bad m value, elemsize= freeindex= span.list=, npages = tracealloc( p->status= in status "
However, only the first B bytes are used,
0000000000837833 | 48:83F8 0B | cmp rax,B
So, this just XOR’s FlareOn2024 with our given checksum. It does this 64 times, so for each of the given character:
0000000000837805 | 48:39D9 | cmp rcx,rbx
which is then compared to a string of bytes. After that, it jumps out of that loop to
000000000083783B | 48:8B15 DE960F00 | mov rdx,qword ptr ds:[930F20]
After which is tries to do some base64 decoding, and the resulting string is compared to:
000000000083785A | 48:8D1D AF910200 | lea rbx,qword ptr ds:[860A10]
And if all is successful we see that it will place the flag “REAL_FLAREON_FLAG.JPG” inside “C:\Users<username>\AppData\Local” and it will print “Noice!!” to the screen.
That seems easy! We can cook up a recipe in cyberchef to accomplish this:
Or we can use python to fix this:
import base64

# Given strings
string1 = "cQoFRQErX1YAVw1zVQdFUSxfAQNRBXUNAxBSe15QCVRVJ1pQEwd/WFBUAlElCFBFUnlaB1ULByRdBEFdfVtWVA=="
string2 = "FlareOn2024bad verb '%0123456789_/dev/stdout/dev/stderrCloseHandleOpenProcessGetFileTypeshort write30517578125bad argSizemethodargs(reflect.SetProcessPrngMoveFileExWNetShareAddNetShareDeluserenv.dllassistQueuenetpollInitreflectOffsglobalAllocmSpanManualstart traceclobberfreegccheckmarkscheddetailcgocall nilunreachable s.nelems=   of size  runtime: p  ms clock,  nBSSRoots=runtime: P  exp.) for minTrigger=GOMEMLIMIT=bad m value, elemsize= freeindex= span.list=, npages = tracealloc( p->status= in status  "

# Use only the first 0xB bytes of string2
string2 = string2[:0xB]

# Base64 decode string1
decoded_string1 = base64.b64decode(string1)

# XOR the decoded string1 with string2
result = bytearray(len(decoded_string1))
for i in range(len(decoded_string1)):
    result[i] = decoded_string1[i] ^ ord(string2[i % len(string2)])

# Print the result
print(result.decode('utf-8'))
In any case, we are left with the string:
7fd7dd1d0e959f74c133c13abb740b9faa61ab06bd0ecd177645e93b1e3825dd
So this is the string of 64 bytes it is expecting as input. We can verify this:

And we find the flag REAL_FLAREON_FLAG.JPG inside C:\Users\John\AppData\Local: